Learn how to develop great Juzu portlets for eXo Platform!
During the coming weeks, we will publish on this blog a series of posts on a Juzu tutorial containing 7 steps where you will learn how to develop a portlet with Juzu, a web framework for developing powerful web applications.
We will start with an ugly portlet with hard-coded data and finish with a sexy fully integrated portlet that allows people to share secrets:
- Step 1: Starting your project
- Step 2: Viewing and posting secrets
- Step 3: Building a sexy secret wall
- Step 4: Like and comment on secrets
- Step 5: Save secrets
- Step 6: Let the whole world create new secrets
- Step 7: Finish the job properly
Today, enjoy step 1!
Step 1 – Starting your project
Introduction
[inlinetweet prefix=”” tweeter=”” suffix=””]In this tutorial, we will learn Juzu by coding a real social portlet named JuZcret[/inlinetweet]. We will cover everything you need to create a real portlet application and show you the best development practices for Juzu.
But, guys, be patient! We have decided to split this tutorial into seven steps for a simple reason: we will smoothly introduce more and more complex and interesting features to build our application gradually.
Yes, for sure, we will start with an ugly portlet with hard-coded data… But, I promise, at the end we will finish with a sexy fully integrated portlet.
And you, as a true Juzu developer, will have enough knowledge to develop funny Juzu applications and evangelize for Juzu around you.
The project
We will develop a new application named JuZcret.
JuZcret is funny social application allowing people to share secrets.
The rules of JuZcret:
1st Rule: Anybody can access JuZcret.
2nd Rule: Anybody can add a secret.
3rd Rule: Anybody can read, comment on and like secrets.
4th Rule: Secrets are anonymous.
What we need
Juzu is a web framework written in Java, so first of all be sure you have a JDK installed on your machine (later than version 7).
We will manage dependencies and project compilation with Maven.
In the coming steps, we will need to use the public Maven repository of eXo for compilation. This is why you need to declare it in your Maven :
</profiles>
	<profile>
		<id>exo-public</id>
		<repositories>
			<repository>
				<id>eXo-pub-repo</id>
				<name>eXoPlatform public repo</name>
				<url>https://repository.exoplatform.org/public</url>
			</repository>
		</repositories>
	</profile>
	...
</profiles>
<activeProfiles>
	<activeProfile>exo-public</activeProfile>
	...
</activeProfiles>
Note: For more information about adding the eXo Platform Maven repository, take a look here.
We will assume that you have a basic knowledge of Java and Web development (HTML, CSS and JavaScript).
I suggest you use a Java IDE such as Eclipse or IntelliJ. But if you prefer, you can use a simple text editor like Sublime Text, Emacs or even Vim (really?).
The compilation and deployment will be managed in a Maven console.
Don’t forget that we are developing a portlet. So we need a portal to deploy it on. Let me think… we need a portal and we are developing a sexy social application? eXo platform will be the best choice!
Create a Project
Generate a Juzu project using the Maven archetype
To start our project, we will use the Maven Juzu archetype, which will automatically generate the whole structure for our Juzu project by populating it with all the files and directories necessary to run a simple Juzu “Hello, World!” application.
Open a new command line and change to your working directory. Mine is:
$ cd ~/java/eXoProjects/juzu-tutorial/
Then type:
mvn archetype:generate \
	-DarchetypeGroupId=org.juzu \
	-DarchetypeArtifactId=juzu-archetype \
	-DarchetypeVersion=1.0.0-cr1 \
	-DjuzuServer=gatein \
	-DgroupId=org.juzu.tutorial \
	-DartifactId=tutorial-juzcret \
	-Dversion=1.0.0-SNAPSHOT \
	-DinteractiveMode=false
With the command above, you are creating a Juzu portlet application project with the Guice injection container.
It’s possible to generate an application with different containers by specifying the option . The valid values are Guice (by default), Spring or CDI.
When generation is finished, a build success message will be displayed in your console:
[INFO] Using following parameters for creating project from Archetype: juzu-archetype:1.0.0-cr1
[INFO] ----------------------------------------------------------------------------
[INFO] Parameter: groupId, Value: org.juzu.tutorial
[INFO] Parameter: artifactId, Value: tutorial-juzcret
[INFO] Parameter: version, Value: 1.0.0-SNAPSHOT
[INFO] Parameter: package, Value: org.juzu.tutorial
[INFO] Parameter: packageInPathFormat, Value: org/juzu/tutorial
[INFO] Parameter: package, Value: org.juzu.tutorial
[INFO] Parameter: version, Value: 1.0.0-SNAPSHOT
[INFO] Parameter: juzuInject, Value: guice
[INFO] Parameter: artifactId, Value: tutorial-juzcret
[INFO] project created from Archetype in dir: /Users/TClement/java/eXoProjects/tutorial-juzcret/
[INFO] ------------------------------------------------------------------------
[INFO] BUILD SUCCESS
[INFO] ------------------------------------------------------------------------
[INFO] Total time: 44.882 s
[INFO] Finished at: 2014-08-29T14:13:46+07:00
[INFO] Final Memory: 13M/129M
[INFO] ------------------------------------------------------------------------
Now we have a new folder containing a simple customized Juzu “Hello, World!” application.
Let’s open it in our IDE.
Open our Juzu project in your IDE
Open our Juzu project in your favorite IDE.
IntelliJ
See How to configure IntelliJ to enjoy Juzu development
Eclipse
See How to configure Eclipse to enjoy Juzu development
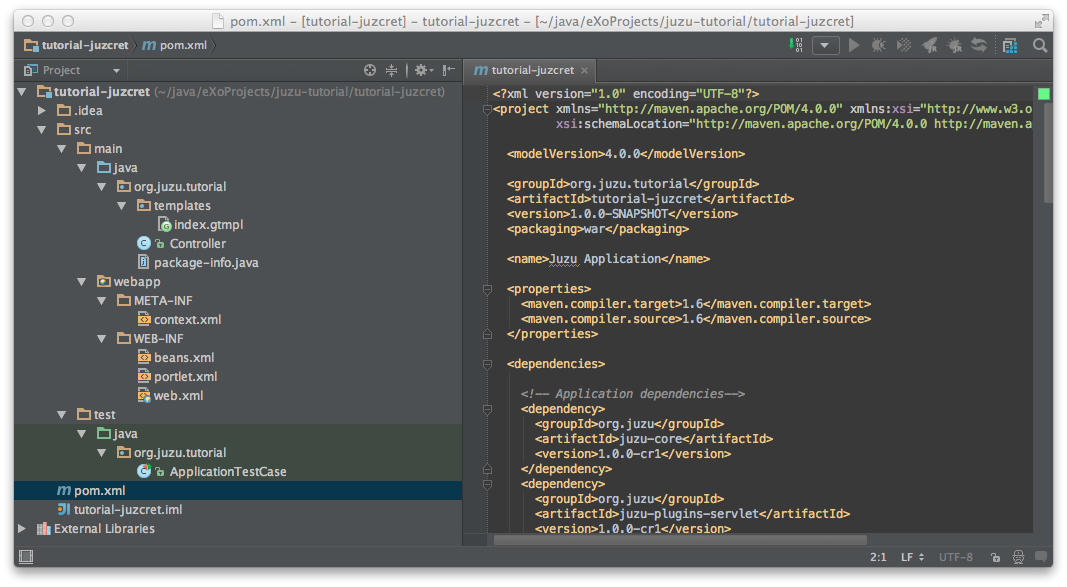
Explore our project
Our project looks like a default Maven web project plus there are specific Juzu files and directories. The most important ones to understand are:
contains all the dependencies needed to run and test our Juzu application
contains the deployment descriptor for our application. If you have already developed a Java web application and portlet, there is nothing new for you here.
contains all the templates used in our application. A template has a static part and a dynamic part, which are used to form dynamic pages for our application.
is our Juzu controller. It’s where we will render a view using the template, define resources and more.
is the configuration file for our application. It’s where we will declare the base package of our application, activate the plugin, add JavaScript or CSS resources and more.
It’s quite simple, isn’t it? If you don’t exactly understand the purpose of each file above, don’t worry. This was just an introduction. We will look more deeply at each file later. Don’t stay here, go ahead!
Run the application
Before running the application, let us personalize our “Hello, World!” Juzu application a little bit to transform it into a simple JuZcret application.
First, open the file generated in the folder. If you are not familiar with portlet development, you just need to know that is the standard JSR-286 portlet configuration file used by the portlet container to deploy our portlet. Let’s modify our portlet name, display name and title:
<?xml version="1.0" encoding="UTF-8"?>
<portlet-app xmlns="https://java.sun.com/xml/ns/portlet/portlet-app_2_0.xsd"
		version="2.0"
		xmlns:xsi="https://www.w3.org/2001/XMLSchema-instance"
		xsi:schemaLocation="https://java.sun.com/xml/ns/portlet/portlet-app_2_0.xsd
		https://java.sun.com/xml/ns/portlet/portlet-app_2_0.xsd">
	<portlet>
		<portlet-name>JuzcretApplication</portlet-name>
		<display-name xml:lang="EN">JuZcret Application</display-name>
		<portlet-class>juzu.bridge.portlet.JuzuPortlet</portlet-class>
		<init-param>
			<name>juzu.app_name</name>
			<value>org.juzu.tutorial</value>
		</init-param>
		<supports>
			<mime-type>text/html</mime-type>
		</supports>
		<portlet-info>
			<title>JuZcret Application</title>
		</portlet-info>
	</portlet>
</portlet-app>
Secondly, make some changes to how it is presented on the home page. Open in the templates folder and modify:
Hello World
By
<h1>JuZcret Application</h1>
<p>
	1st Rule: Anybody can access to JuZcret<br/>
	2nd Rule: Anybody can add secret<br/>
	3rd Rule: Anybody can read, comment, and like secrets<br/>
	4nd Rule: Secret is anonymous<br/>
</p>
Deploy it in eXo Platform
Don’t forget that we are developing a portlet application. That means that we need a portal to deploy it.
Let’s start by downloading eXo Platform Community Edition
Using the command line, go to your download directory:
$ cd ~/Downloads
Unzip the download file:
$ unzip eXo-Platform-community-4.1.zip
Copy it and paste it into the directory of your choice (I use ):
$ cp -R platform-community-4.1/ ~/java/eXoProjects/juzu-tutorial/platform-community-4.1/
Now we have to add our Portlet in Platform.
Go back to your working directory:
$ cd ~/java/eXoProjects/juzu-tutorial/tutorial-juzcret/
Compile the application:
$ mvn clean install
BUILD FAILURE? What? I haven’t even finished step one of this tutorial!
Relax guys. As usual, try to understand what’s gone wrong…
In the Maven log in the command line you can read:
Results:

Failed tests: testFoo(org.juzu.tutorial.ApplicationTestCase): expected:<[Hello World]> but was:<[JuZcret Application(..)

Tests run: 1, Failures: 1, Errors: 0, Skipped: 0
A test failed?
Yes. The Juzu archetype created a default unit test case for “Hello, World!” to test whether the HTML for our application is “Hello, World!”.
However, that was not the case. We modified the index template, so the test failed.
Take a look at the unit test in :
@Test
@RunAsClient
public void testFoo() {
	driver.get(deploymentURL.toString());
	WebElement body = driver.findElement(By.tagName("body"));
	assertEquals("Hello World", body.getText());
}
The aim of this step is not to show you how to develop a unit test with Juzu. This will be covered later in step 7. For now, just remove .
So, compile it again:
$ mvn clean install
Here you should get Build Success. Great. Now it’s time to deploy our portlet in eXo Platform.
Copy the created war file to the eXo Platform web apps directory:
$ cp ./target/tutorial-juzcret.war ~/java/eXoProjects/juzu-tutorial/platform-community-4.1.0-RC1/webapps/
Go to the eXo Platform directory:
$ cd ~/java/eXoProjects/juzu-tutorial/platform-community-4.1.0-RC1/
Start eXo in dev mode:
$ ./start_eXo.sh --dev
Open your web browser and go to https://community.exoplatform.com/portal/intranet/home
Note Username: root | Password: gtn
What we want to do is to add our new portlet to a dedicated JuZcret page. This will let everybody see and share secrets!
To do so, we need to proceed in two steps:
1. Add our new portlet to a category.
2. Add our new portlet to the dedicated JuZcret page.
To be able to add our new portlet, first we need to add it to a category.
Because we are developing a social application, we will add it to the social category.
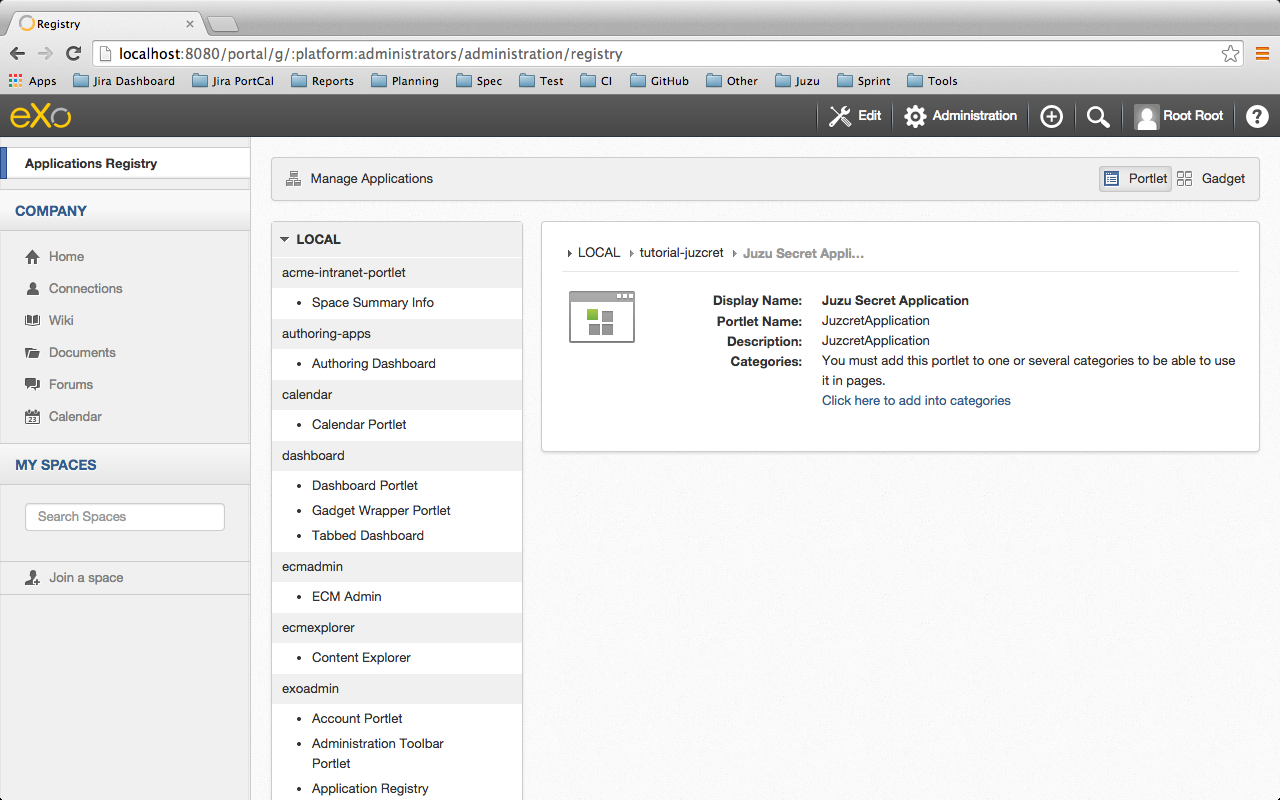
Click on Administration –> Applications and click on the portlet on the right.
If you scroll down, you should see our portlet “Juzu Secret Application” in the “tutorial-juzcret” section:
Click on it:
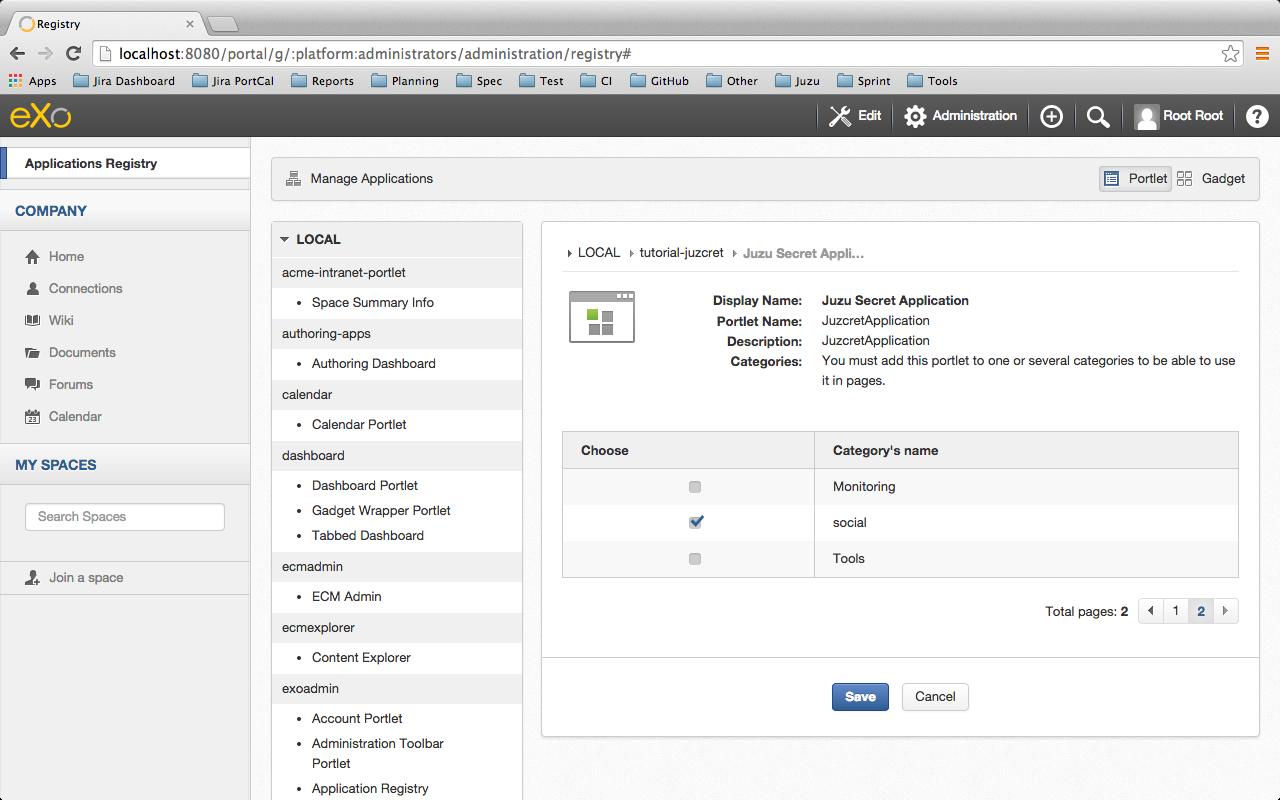
Click on “Click here to add into categories”.
Add it to the social category:
Then save it.
Second, we want to add our new portlet to the dedicated JuZcret page.
Go back to the Home Page of eXo and then click on Edit on the top navigation bar. Then click on Page à Add Page to open the Page Creation Wizard form.
Select “up level” on the left menu, set JuZcret as Node and Display Name and check that it’s visible:
Click “Next” twice.
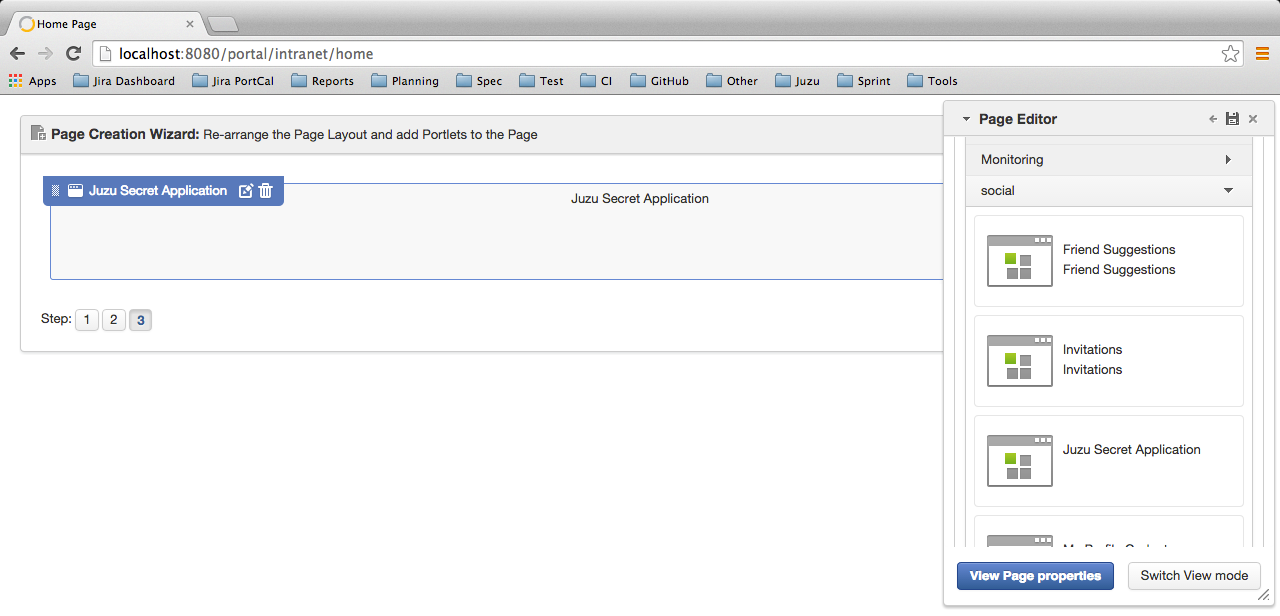
In Page Editor on the top right, expand “social” and drag and drop the Juzu Secret Application to the left:
Then click on the finish icon on the top right of the Page Editor and look at the result:
Ah… ok… nice…
Ah, ah! You’ve got what I promised: an ugly static portlet!
We will soon publish on the eXo blog Step 2 – Viewing and posting secrets, where we will add some functionality to our portlet. (Edit: step 2: “viewing and posting secrets” is live!)
The final source of step 1 is available for downloading on Github
Next steps:
– Learn how to develop great Juzu portlets for eXo Platform!
– Step 2: viewing and posting secrets
– Step 3: Building a sexy secret wall
– Step 4: adding Likes and Comments for Secret
– Step 5: Saving Secrets in the JCR
– Step 6: Let the whole world create new secrets
– Step 7: Finishing the job properly with unit test
Join the eXo tribe by registering for the community and get updates, tutorials, support, and access to the Platform and add-on downloads!
Make the most out of eXo Platform 4
Register to the next webinar and get a complete overview of what you can do with eXo Platform 4. Reserve your seat now!


