Juzu Day 3: The Coolness
Today is the last of my three days on Juzu and I want to show some nice features you can find inside.
If you want to start from Day 1, you can take a look in the previous posts:
– Three Days with Juzu: Write a Killer App;
– Juzu Day 2: Real Web Apps as well.
So, if you want to see some nice gems, it’s here.
All the Coolness
We know how to write an app, but do we know how to write something cool, something you say “it’s fucking great, man!” when you look at it? Of course, there are a number of other gems in Juzu.
Ajax + jQuery
The first one, and it’s a big one, is about Ajax calls. We saw at the beginning of this “quite long” article that you can declare a resource with @Ajax annotation, like here in maintainSession:
@Ajax
@Resource
public Response.Content maintainSession()
{
  return Response.ok("OK").withMimeType("text/html; charset=UTF-8").withHeader("Cache-Control", "no-cache");
}
It’s about Ajax, right? So, we added jQuery as an asset in the packaging-info:
...
        scripts = {
                @Script(src = "js/jquery-1.7.1.min.js", id = "jquery"),
  ...
Thanks to the amazing stuff that is done under the hood by Julien, Juzu will detect you’re using jQuery and will generate specific jQuery objects so you can call your method very easily from within the JavaScript. Let’s take a look inside chat.js to see this:
var $chatApplication = $("#chat-application");
var jzMaintainSession = $chatApplication.jzURL("ChatApplication.maintainSession");
..
function maintainSession() {
  $.ajax({
    url: jzMaintainSession,
    success: function(response){
      console.log("Chat Session Maintained : "+response);
    },
    error: function(response){
      chatSessionInt = clearInterval(chatSessionInt);
    }
  });
}
There’s also $.jzLoad and $.jzAjax methods if you want a shortcut to jQuery $.ajax() method, like:
$(this).jzLoad("ChatApplication.foo"); //will load data in 'this'For me, it’s a killer feature because it makes your code so much easier to read.
Less
I already talked a little bit about Less integration but here is a quick example about how great this is to write CSS.
The fact is I like Less but without this integration, I could certainly not use it. But now, since it’s part of Juzu, I have no excuse since it takes just a line to use Less.
So, let’s say you want to define emoticons in your CSS. Usually, you will do this:
.emoticon-smile{
  background:url('/chat/img/emoticons/smile.png') no-repeat 0px 0px;
}
.emoticon-big-smile{
  background:url('/chat/img/emoticons/bigsmile.png') no-repeat 0px 0px;
}
.emoticon-eye-blink{
  background:url('/chat/img/emoticons/eyeblink.png') no-repeat 0px 0px;
}
.emoticon-no-voice{
  background:url('/chat/img/emoticons/novoice.png') no-repeat 0px 0px;
}
.emoticon-sad{
  background:url('/chat/img/emoticons/sad.png') no-repeat 0px 0px;
}
.emoticon-surprise{
  background:url('/chat/img/emoticons/surprise.png') no-repeat 0px 0px;
}
One thing I hate is copy/pasting the some code; same thing goes for CSS, I hate it like that. 1) It’s ugly. 2) It’s hard to read. With Less integration in Juzu, you just need to do this in emoticons.less:
.background-emoticon(@image) {
  background: url('@{imgEmoticonPath}@{image}') no-repeat 0px 0px;
}
.emoticon-smile {
  .background-emoticon('smile.png');
}
.emoticon-big-smile {
  .background-emoticon('bigsmile.png');
}
.emoticon-eye-blink {
  .background-emoticon('eyeblink.png');
}
.emoticon-no-voice {
  .background-emoticon('novoice.png');
}
.emoticon-sad {
  .background-emoticon('sad.png');
}
.emoticon-surprise {
  .background-emoticon('surprise.png');
}
Now, take a look at that, it’s far better, isn’t it? 🙂
You can even do more tricky stuff with Less like, for example, in the panels.less:
.chat-panel (@heightParam, @colorParam) {
  float: left;
  z-index: 10;
  position: absolute;
  width: @width;
  height: @heightParam;
  color: @colorParam;
  padding: 50px 0px 0px;
  text-align: center;
  font-size: 14px;
  font-weight: normal;
}

.chat-error-panel, .chat-login-panel, .chat-about-panel, .chat-demo-panel {
  .chat-panel((@height - 51), white);
  background-color: @colorBgPanel;
}
.chat-help-panel {
  .chat-panel((@height - 1), black);
  background:url('@{imgPath}help-panel.png') no-repeat 0px 0px;
  padding: 0px 0px 0px 0px;
}
.chat-sync-panel {
  .chat-panel((@height - 51), white);
}
Here, you declare a class with arguments and you can even do some math with your params (like @height – 51). I can’t thank enough all the developers out there who provide jQuery, Bootstrap, Less and all these kinds of life savers.
Responsive Design
There’s a big trend on responsive design. If you don’t really know what it is, I invite you to spend even more time watching a video on this:
Responsive Design from Benjamin Paillereau on Vimeo.
To make it simpler, it’s about developing one app to rule them all! You write once and it will adapt automatically depending on whether accessing your site or app from a desktop, a small notebook, an iPad, an iPhone; you name it.
All you need to do is two things:
- Manage viewport with a viewport metatag in your html header;
- Create multiple CSS for each media (small screen, large screens, print, etc).
Viewport metatag
Again, thanks to Juzu’s coolness, it will only take 10 seconds for this step. Just add the right withMetaTag in your render and you’re done – like in the chat:
indexDemo.render().withMetaTag("viewport", "width=device-width, initial-scale=1.0");It’s that easy!
Media in CSS
Well, this is where Less integration is a killer and why you should really use it!
It may be a pain in the *** to manage this but not with Less. Again, thanks to Less integration in Juzu, it’s just a few lines of code and thinking your CSS the right way – like for the Chat app:
@media (min-width: 768px) and (max-width: 1199px) {
  @height:                      700px;
  @width:                       760px;
  @heightMessage:               60px;
  @widthUsers:                  200px;
  @widthMessages:               (@width - @widthUsers - 4);

  @import "sized";
  @import "panels";
}
As all my CSS uses @height and @width to manage sizable elements, I can import the Less files with new parameters for each media size and I’m done. Here’s the same for big desktops:
@media (min-width: 1200px) {
  @height:                      700px;
  @width:                       1100px;
  @heightMessage:               60px;
  @widthUsers:                  300px;
  @widthMessages:               (@width - @widthUsers - 4);

  @import "sized";
  @import "panels";

}
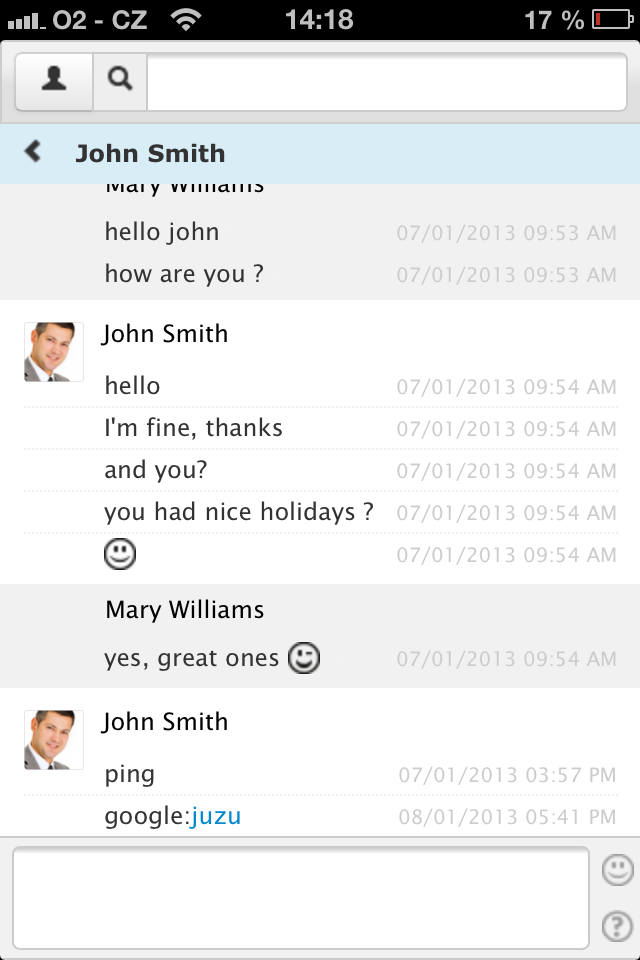
So, writing a responsive CSS is not that hard, you have no excuse not to make them responsive! 🙂 (well, at least if you’re using Juzu… If you’re using one of the usual suspects, good luck with this). Here’s what the Chat app looks like on iPhone:
Fluid App, why not?
I’ll end with something a little off topic, but I think we have a final great gem here. It’s also so simple to add it into a Juzu app, so I wanted to add a note about it.
As I wrote a Chat, the thought popped into my head: hummm, it would be great to use it like any regular app… Luckily, I’m a Macbook Pro user, which means I’m running Max OS X. And we have a great app called Fluid App.
It’s great because it allows you to convert a website to an app and that’s exactly what I did in this Juzu app.
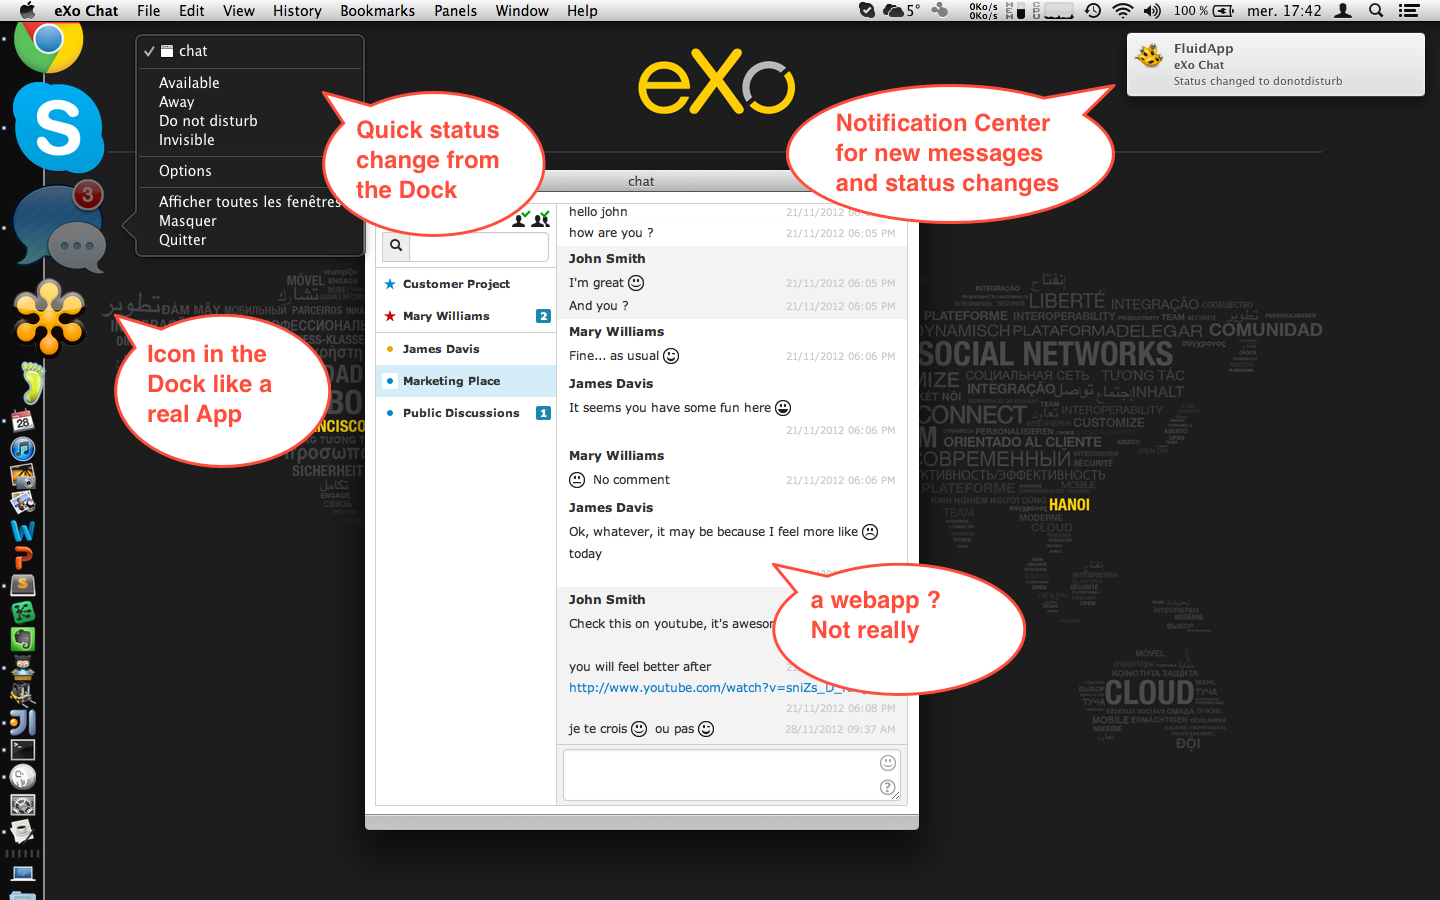
It looks like this:
And basically, what you need to do is not that hard since Juzu allows you to do what you want, right?
As I’m using extensively jQuery, which is well integrated in Juzu, I just added a few calls to make my app Fluid Aware.
Maintain session if loaded as a Fluid App
We need first to maintain the session as it’s part of the real app User Experience.
if (window.fluid!==undefined) {
    chatSessionInt = clearInterval(chatSessionInt);
    chatSessionInt = setInterval(maintainSession, chatIntervalSession);
  }
Update the notification badge
Then, we can add a badge on the Dock icon.
window.fluid.dockBadge = totalNotif;
Send growl notification if available
We can also send notifications in the Notification Center.
if (totalNotif>oldNotif && profileStatus !== "donotdisturb" && profileStatus !== "offline") {
  window.fluid.showGrowlNotification({
     title: "eXo Chat",
     description: "You have new messages",
     priority: 1,
     sticky: false,
     identifier: "messages"
  });
}
Add change status menu item in the Dock app
Finally, we can even change our status right from the Dock 🙂
function initFluidApp() {
 if (window.fluid!==undefined) {
   window.fluid.addDockMenuItem("Available", setStatusAvailable);
   window.fluid.addDockMenuItem("Away", setStatusAway);
   window.fluid.addDockMenuItem("Do not disturb", setStatusDoNotDisturb);
   window.fluid.addDockMenuItem("Invisible", setStatusInvisible);
 }
}
initFluidApp();
Nothing more is needed; from this point on, the application can be added as a real app in my Applications folder.
What’s Next?
So, you did it, you read these three posts to the end. I want first to give you a big thank for your reading time.
I hope they helped you to discover this new web framework that is Juzu.
You will find some documentation on its official website: http://juzuweb.org/
If you have questions about Juzu, you can go to the Google group to ask them: http://groups.google.com/group/juzu.
And if you want to contribute, it’s on GitHub: https://github.com/juzu/juzu.
Again, thousand kudos to Julien and his great work on Juzu!
Finally, a small word about the Chat application: you want to know more or help me to build an even better Chat application? Contact me or simply fork the Chat GitHub project, I’ll be more than happy to integrate new cool ideas in the Chat (or bug fixes).
Thus, if you want to take a deeper look at the code, it’s Open Source and available on eXo Addons Repositories: https://github.com/exo-addons/chat-application« Again, thanks for watching and stay tuned – more things are coming, Benjamin. »

