eXo Platform 5.2: Extend the Chat application!
In eXo Platform 5.2 we have made the chat application more extensible. In this article we will show you how to use these new capabilities.
Extension points
Several extension points are now available in the Chat application:
- Message composer application:
– new applications can be integrated into the message composer in addition to the default ones (new event, upload file, assign task, etc.)

- Message types
– new types of messages can be added, allowing you to define specific layouts.
- Message notifications
– new message notifications can be added, allowing you to define specific layouts.
- Message actions
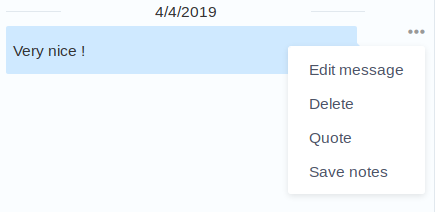
– new actions can be added in the contextual menu of a message in addition to the default ones (Edit message, Delete, Quote and Save notes.).

- Room actions
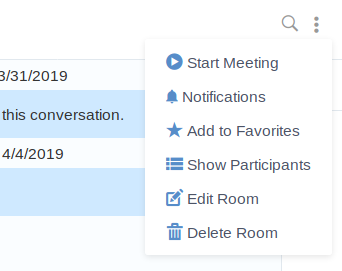
– new actions can be added in the contextual menu of a room in addition to the default ones (Add to Favorites, Edit, Delete, etc.)

Our first chat extension
Note
The examples in this article use ES6 or Vue features, which require Webpack (or any other tool) to work correctly in all browsers. This article does not aim to explain how to configure Webpack. Please refer to the source code of this extension for a full example configured with NPM+Webpack.
Let’s create a new extension in order to add a new message composer application.
The first step is to create an empty extension as described in the documentation. Once done, we need to add a new javascript file called MyChatPlugin.js. It will contain the code used to add the new message composer application.
Let’s fill our javascript file with the following content:
requirejs(['SHARED/extensionRegistry'], function(extensionRegistry) {
 extensionRegistry.registerExtension('chat', 'composer-application', chatMyComposerAppPlugin);
});

const chatMyComposerAppPlugin = {
 key: 'my',
 rank: 70,
 type: 'type-my',
 nameKey: 'exoplatform.chat.my.name',
 labelKey: 'My Chat Plugin',
 iconClass: 'uiIconChatMy',
 html: function() {
   // return html of the popup displayed when clicking the action
   return 'My Chat Composer Application plugin';
 },
 submit: function() {
   // function executed when the submit button of the popup is clicked, after the validate method
   message = {
     msg : 'My message ! (sent on ' + new Date() + ')',
     room : contact.room,
     clientId: new Date().getTime().toString(),
     user: eXo.chat.userSettings.username,
     timestamp: Date.now()
   };

   // send the message by dispatching the event exo-chat-message-tosend-requested
   document.dispatchEvent(new CustomEvent('exo-chat-message-tosend-requested', {'detail' : message}));

   return {hide: true};
 }
};
This basic example:
- adds an action called “My Chat Plugin” in the composer actions list
- displays a popup containing the text “My Chat Composer Application Plugin” when clicking on this new action
- sends a message when clicking on the primary button of the popup and hides the popup.
The new API ExtensionRegistry.registerExtension is used to register the extension. It takes three arguments:
- the name of the target application of the extension, here “chat”
- the type of the extension, here “composer-application”
- the extension definition
The extension definition is an object composed of properties and methods to define its content and its behaviour:
- key: unique key for the extension
- rank: rank in the list of composer applications
- type: unique type of the extension
- nameKey: unique key for the extension name
- labelKey: key for the label (to define translations)
- iconClass: CSS class to use for the application icon
- html: function which returns the html of the popup displayed when clicking the action
- submit: function executed when the submit button of the popup is clicked, and after the validate method has been executed
More properties and methods are available for this extension, please refer to the documentation for more details.
In order to insert this script into the chat application, it must be declared in a file called gatein-resources.xml inside the WEB-INF folder:
<?xml version="1.0" encoding="ISO-8859-1" ?>

<gatein-resources xmlns:xsi="http://www.w3.org/2001/XMLSchema-instance"
  xsi:schemaLocation="http://www.exoplatform.org/xml/ns/gatein_resources_1_4 http://www.exoplatform.org/xml/ns/gatein_resources_1_4"
  xmlns="http://www.exoplatform.org/xml/ns/gatein_resources_1_4">

 <javascript>
   <param>
     <js-module>myChatPlugin</js-module>
     <js-path>/js/MyChatPlugin.js</js-path>
   </param>
 </javascript>

</gatein-resources>
We are now done. Build your project and deploy the war file in your eXo server. You should now have a new item in the composer applications:
 Clicking on the new item displays a popup with the message “My Chat Composer Application Plugin”, and clicking on the “Post” button sends the message.

Adding a room action
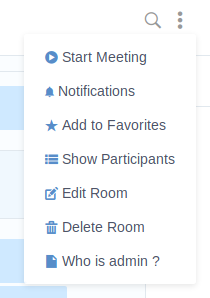
We will try another extension capability by adding a new action in the room’s actions. In the same way as for the new composer application, the extension registry API must be used to register the new action. The following example adds an action “Who is admin?”, which prints the room administrators when clicked:
requirejs(['SHARED/extensionRegistry'], function(extensionRegistry) {
 extensionRegistry.registerExtension('chat', 'room-action', newAction);
});

// define the new action
const newAction = {
 key: 'whoIsAdmin',
 labelKey: 'Who is admin ?',
 class: 'uiIconAdmin',
 type: 't',
 enabled: function() {
   return true;
 }
};

document.addEventListener('exo-chat-setting-whoIsAdmin-requested', function(room) {
 const message = {
   msg : 'Administrator of this room is: ' + room.detail.admins.join(),
   room : room.detail.room,
   clientId: new Date().getTime().toString(),
   user: eXo.chat.userSettings.username,
   timestamp: Date.now()
 };

 // send the message by dispatching the event exo-chat-message-tosend-requested
 document.dispatchEvent(new CustomEvent('exo-chat-message-tosend-requested', {'detail' : message}));
});
The extension object is simple. Beyond the classic properties (key, labelKey, class), the function “enabled” can be provided to decide if the room action must be displayed or not. In the example this function returns true so it is always displayed.
The click on the new action is handled by the event exo-chat-setting-<actionKey>-requested (so, exo-chat-setting-whoIsAdmin-requested in this example). Here we add a listener on this event to send a message which gives the room administrator.
Once deployed, the new action appears in the room actions:

And when clicked, a message is sent in the room giving the name of the room administrator:
 Overriding a component
In addition to these extension points, all the Vue components of the Chat application can be overridden. This allows customisation of almost everything in the application but it comes with a drawback: all overridden components must be checked against their original version when upgrading eXo Platform to merge possible changes.
As for other extension points, the extension registry API must be used to register the custom component. This time we will use the ExtensionRegistry.registerComponent method, which accepts the following three arguments:
- the name of the target application of the extension
- the name of the component to override
- the custom component
import ExoModalCustomized from './ExoModalCustomized.vue';

requirejs(['SHARED/extensionRegistry'], function(extensionRegistry) {
 extensionRegistry.registerComponent('chat', 'exo-modal', ExoModalCustomized);
});
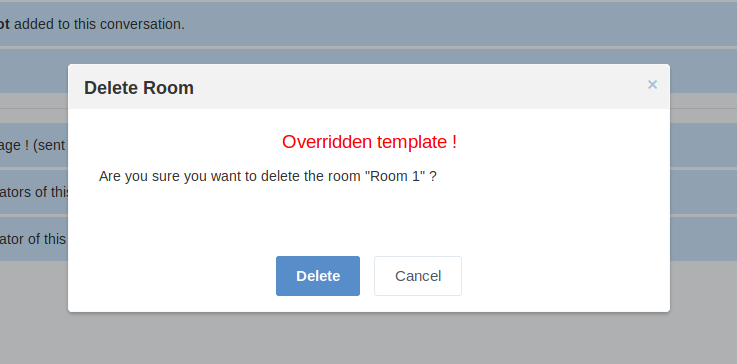
In this example we override the component exo-modal of the chat application. The imported Vue file is the new version of the component.
<template>
 <div class="chat-modal-mask uiPopupWrapper">
   <div :class="modalClass" class="uiPopup chat-modal">
     <div class="popupHeader">
       <span class="PopupTitle popupTitle">{{ title }}</span>
       <a v-if="displayClose" class="uiIconClose pull-right" @click="closeModal"></a>
     </div>
     <div class="PopupContent popupContent">
       <div style="color: red;text-align: center;font-size: 14pt;">Overridden template !</div>
       <slot></slot>
     </div>
   </div>
 </div>
</template>

<script>
export default {
 props: {
   displayClose: {
     type: Boolean,
     default: true
   },
   title: {
     type: String,
     default: ''
   },
   modalClass: {
     type: String,
     default: ''
   }
 },
 methods: {
   closeModal() {
     // Emit the click event of close icon
     this.$emit('modal-closed');
   }
 }
};
</script>
We have added text in the HTML part to show the customisation, as you can see in the result:
 Sources
Examples from this article are available here, all gathered in a single plugin, and configured with Webpack and NPM.
Now it is your turn to implement your great ideas to enhance the Chat application with this new API. Please try it and give us your feedback!
