Boost your eXo Platform Development with JRebel!
JRebel is a tool that enables developers to instantly reload changes in Java sources files, without having to redeploy the application or restart the server. In this tutorial, we will demonstrate how to use JRebel to speed up development with eXo Platform. JRebel integrates well with Eclipse, which we used in the following example. To learn how to start eXo Platform in Eclipse, check out this tutorial.
Install JRebel in Eclipse
The first step is to install JRebel in Eclipse. Simply follow the first 3 steps in this tutorial on the JRebel website.
New Portlet Project
Before going further with JRebel, you need to create a new portlet project:
- Go to File > New > Project…
- Select Maven > Maven Project
- Check Create a simple project (skip archetype selection)
- Click Next
- Fill maven information. For example:
- Group ID: org.exoplatform
- Artifact ID: jrebel.portlet
- Version: 1.0.0-SNAPSHOT
- Packaging: war
- Name: Portlet with JRebel
- Description: Portlet with JRebel
- Click Finish
Once created, you can add the source file for the portlet:
src/main/webapp/WEB-INF/web.xml
<?xml version="1.0" encoding="UTF-8"?>
<!DOCTYPE web-app PUBLIC "-//Sun Microsystems, Inc.//DTD Web Application 2.3//EN"
                         "http://java.sun.com/dtd/web-app_2_3.dtd">
<web-app>
    <display-name>JRebelPortlet</display-name>
</web-app>
src/main/webapp/WEB-INF/portlet.xml
<?xml version="1.0" encoding="UTF-8"?>

<portlet-app
    xmlns="http://java.sun.com/xml/ns/portlet/portlet-app_1_0.xsd"
    version="1.0"
    xmlns:xsi="http://www.w3.org/2001/XMLSchema-instance"
    xsi:schemaLocation="http://java.sun.com/xml/ns/portlet/portlet-app_1_0.xsd
                        http://java.sun.com/xml/ns/portlet/portlet-app_1_0.xsd">

    <portlet>
        <description>Portlet with JRebel</description>
        <portlet-name>portlet-jrebel</portlet-name>
        <display-name>Portlet with JRebel</display-name>

        <portlet-class>org.exoplatform.jrebel.portlet.MyPortlet</portlet-class>

        <supports>
            <mime-type>text/html</mime-type>
            <portlet-mode>VIEW</portlet-mode>
            <portlet-mode>HELP</portlet-mode>
        </supports>

        <supported-locale>en</supported-locale>

        <portlet-info>
        	<title>Portlet with JRebel</title>
        	<short-title>Portlet with JRebel</short-title>
        	<keywords>JRebel</keywords>
        </portlet-info>
    </portlet>
</portlet-app>
src/main/java/org/exoplatform/jrebel/portlet/MyPortlet.java
package org.exoplatform.jrebel.portlet;

import java.io.IOException;

import javax.portlet.GenericPortlet;
import javax.portlet.PortletConfig;
import javax.portlet.PortletException;
import javax.portlet.PortletRequestDispatcher;
import javax.portlet.RenderRequest;
import javax.portlet.RenderResponse;

public class MyPortlet extends GenericPortlet {

    private static final String VIEW_PAGE = "/view.jsp";
    private static final String HELP_PAGE = "/help.jsp";

    private PortletRequestDispatcher viewDispatcher;
    private PortletRequestDispatcher helpDispatcher;

    public void doView( RenderRequest request, RenderResponse response )
        throws PortletException, IOException {

    	viewDispatcher.include( request, response );
    }

    protected void doHelp( RenderRequest request, RenderResponse response )
        throws PortletException, IOException {

    	helpDispatcher.include( request, response );
    }

    public void init( PortletConfig config ) throws PortletException {
        super.init( config );
        viewDispatcher = config.getPortletContext().getRequestDispatcher( VIEW_PAGE );
        helpDispatcher = config.getPortletContext().getRequestDispatcher( HELP_PAGE );
    }

    public void destroy() {
    	viewDispatcher = null;
    	helpDispatcher = null;
        super.destroy();
    }
}
pom.xml
Add the portlet 2.0 dependency:
<dependency>
	<groupId>javax.portlet</groupId>
	<artifactId>portlet-api</artifactId>
	<version>2.0</version>
	<scope>provided</scope>
</dependency>
src/main/webapp/view.jsp
Hello World!
src/main/webapp/help.jsp
Help?
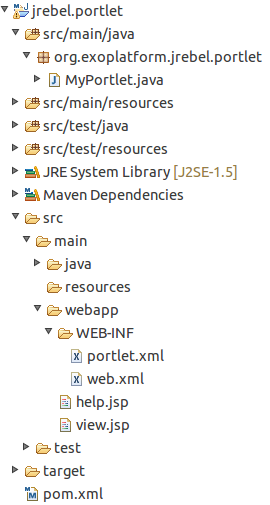
You should now have the following project:

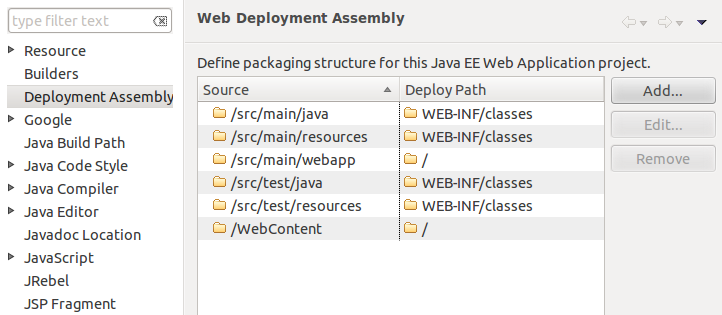
In order to deploy your project to a server, it must have the “Dynamic Web Module” facet. This can be done in the project’s properties, in the Project Facets item. Once this is completed, check the Dynamic Web Module item and select version 2.5 (and 1.6 for Java). Finally, declare the src/main/webapp folder as part of the web application structure in the section Deployment Assembly of the project’s properties:
On this screen, you can declare all the resources you want to push to the web application on your server.
Configure the Project to Use JRebel
The next step is to make JRebel aware of your project:
- Right-click on the project > JRebel > Add JRebel Nature
- Right-click on the project > JRebel > Generate rebel.xml
- select the src/main/resources folder
Open the rebel.xml. You can see that JRebel will monitor all the folders pushed to your web application on the server, including the Java source files in target/classes and the files in src/main/webapp:
<?xml version="1.0" encoding="UTF-8"?>
<application xmlns:xsi="http://www.w3.org/2001/XMLSchema-instance" xmlns="http://www.zeroturnaround.com" xsi:schemaLocation="http://www.zeroturnaround.com http://www.zeroturnaround.com/alderaan/rebel-2_0.xsd">

	<classpath>
		<dir name="/home/thomas/exoplatform/dev/projects/jrebel.portlet/target/classes">
		</dir>
		<dir name="/home/thomas/exoplatform/dev/projects/jrebel.portlet/target/test-classes">
		</dir>
	</classpath>

	<web>
		<link target="/">
			<dir name="/home/thomas/exoplatform/dev/projects/jrebel.portlet/WebContent">
			</dir>
		</link>
		<link target="/">
			<dir name="/home/thomas/exoplatform/dev/projects/jrebel.portlet/src/main/webapp">
			</dir>
		</link>
	</web>

</application>
Configure the Server to Use JRebel
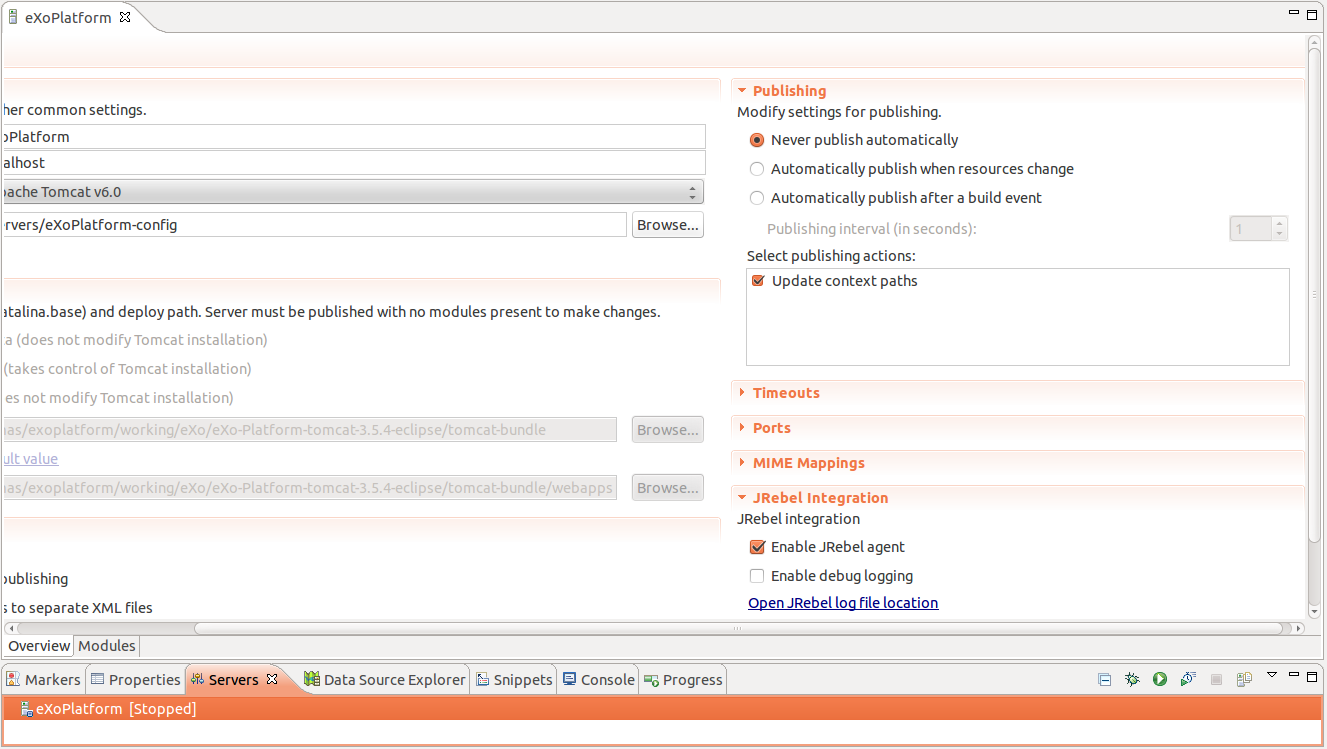
The server declared in Eclipse must also be configured to take use JRebel:
- Go to the Servers view in Eclipse
- Double-click on your eXo Platform server
- In the JRebel integration section, check the Enable JRebel agent checkbox
- Be sure to disable the Automatic Publishing in the Publishing section (the Never publish automatically must be checked)
Publish the Portlet in the Server
We are now ready to deploy your portlet:
- Right-click on the server > Add and Remove…
- Select the project and click Add
- Click on Finish
- Start the server
After the server is started, you can add your portlet to a page and see the “Hello World !” text:

JRebel in Action!
To see JRebel in action, change the portlet class. For example, add a new request attribute to be used in the JSP:
...
    public void doView( RenderRequest request, RenderResponse response )
        throws PortletException, IOException {

    	request.setAttribute("message", "Hello Again !");
    	viewDispatcher.include( request, response );
    }
...
and in the view.jsp:
Your message : <%=request.getAttribute("message")%>Your changes have been applied without redeploying the webapp. You should only see this in the logs:
[2012-10-11 13:56:01] JRebel: Reloading class 'org.exoplatform.jrebel.portlet.MyPortlet'.
Cool, isn’t it? 😉
JRebel supports most of the changes that are possible in your Java classes, including changes to method bodies, adding/removing constructors/methods/fields/classes/annotations, and more.
What about Services?
In eXo Platform, you occasionally need to create services and deploy them as jar files in the server, which almost always requires a restart. With JRebel, you no longer have to perform time-consuming server restarts for every new or updated service.
As you did with the portlet, create a new maven project. Add the JRebel Nature, and generate the rebel.xml file in src/main/resources. The other steps (Dynamic Web Module facet, …) are not necessary since it is not a webapp.
Next, create a new eXo service by following the example described in this tutorial. After completing the steps (add the eXo dependency in pom.xml, create the class and add the configuration.xml in src/main/resources), you are now ready to deploy the service. The first deployment will require a restart, so build your maven project, stop your eXo Platform server, copy the jar file in the lib folder of the server, and restart the server.
Once started, the URL /portal/rest/user/name/thomas returns the message “Hello thomas!”. Change the service class, for example :
@Path("/name/{name}/")
@GET
public Response getName(@PathParam("name") String name) throws Exception {
	return Response.ok("Welcome in the JRebel world " + name + "!").build();
}
Simply call the same URL again, and you’ll see the message “Welcome in the JRebel world thomas!”.
Conclusion
Using JRebel in development will save you a lot of redeployments and restarts. The only limitation is that you can’t reload the eXo configuration this way. Oh, and I see another drawback: you won’t be able to use all that “server restart time” as an excuse to take a coffee break anymore 😉


